Egg Table

The Egg table

Sorry. It’s been a long time since my last post and for that I can only blame work. A bit of a rubbish excuse I suppose, given that one of my aims for this blog was to provide an outlet to get my mind off what I do for a living. Sometimes it’s difficult to do though, isn’t it? There’s no recipe this time around, but hopefully people who own an Egg can see from the following that there is fun to be had without even lighting any charcoal…

When we got it, the Egg came with a Nest on wheels which was pretty handy; we wheeled it indoors when we weren’t using it and out again when we were. However, after we moved house from Brixham by the sea in South Devon to the heart of the West Midlands (don’t ask) a more permanent solution was needed.

A lot of blokes of my kind of age have a Dad that knows how to do things. My Dad knows how to do MANY things. He has a large workshop in which he houses a lot of tools and loves nothing more than to use both to make stuff. I am not without tools and a shed of my own, but this felt like the kind of project that would be more satisfying when completed with the help of the right sort of chap. Dad fitted the bill perfectly.

I hatched a plan.

I read a few posts and looked at a few YouTube videos. I found the plans that Big Green Egg publish and used them as a starting point. I measured the height of our kitchen worktops and used that and the standard depth to work out the size of the top. I got to my parents’ house with a rough drawing and some measurements sketched out with the goal to make a useable table which was functional. Although both practical people, I don’t think Dad and I had it in mind that we were going to be making a beautiful bit of furniture. This was definitely going to be more like advanced Year 11 woodwork than a Chippendale’s (not those ones) with an eye more on function than form.

The first job was to glue up the top with pine tongue and groove boards. We used five 150mm planks to give a finished width of 650mm, about the same as a normal kitchen worktop. Plenty of wood glue went in the joints and then clamped up the whole thing up for a few hours while we tackled the main body of the table. Despite my plans, we definitely had a period to begin with which would, in days gone by, have been characterised by us pushing our trilbies back on our heads, putting the kettle on and lighting our pipes while we had a good think and a look at the pile of pressure treated rough-sawn gravel boards and fence posts we had. One of us might have jabbed our pipe stem at the other to make a well-though out point whilst opining “you know, that might just work”. Picture, if you will, the equivalent of the engineering excellence of Isambard Kingdom Brunel, or Barnes Wallace, or David Brown. As everyone knows, thinking and looking at length are the cornerstones of all successful DIY projects. Measurements were taken and calculations made about the height of the shelf to ensure the top of the Egg would be high enough. Once the component pieces were cut to size, it was a pretty quick job to screw it all together. We clamped the bits in place and used decking screws; the ends were done first and then connected with the long rails. It stood firm and didn’t wobble.

On to the top. The glue had set and it looked the business. Dad used a router with a straight-cutting bit and a metal radius arm to cut the circle out in 2 or 3 passes. Beforehand we had another ponder about how much bigger the hole should be than the Egg, given the temperature the ceramic gets to. We settled on a 15mm gap which seems to be fine. A LOT of measuring was done to make sure the centre of the hole was in the right place relative to where we bolted the now wheel-less nest to the shelf. We screwed blocks to the underside of the top so they butted up to the rails and stiles of the frame so we could screw through those to secure it with no screw heads showing.

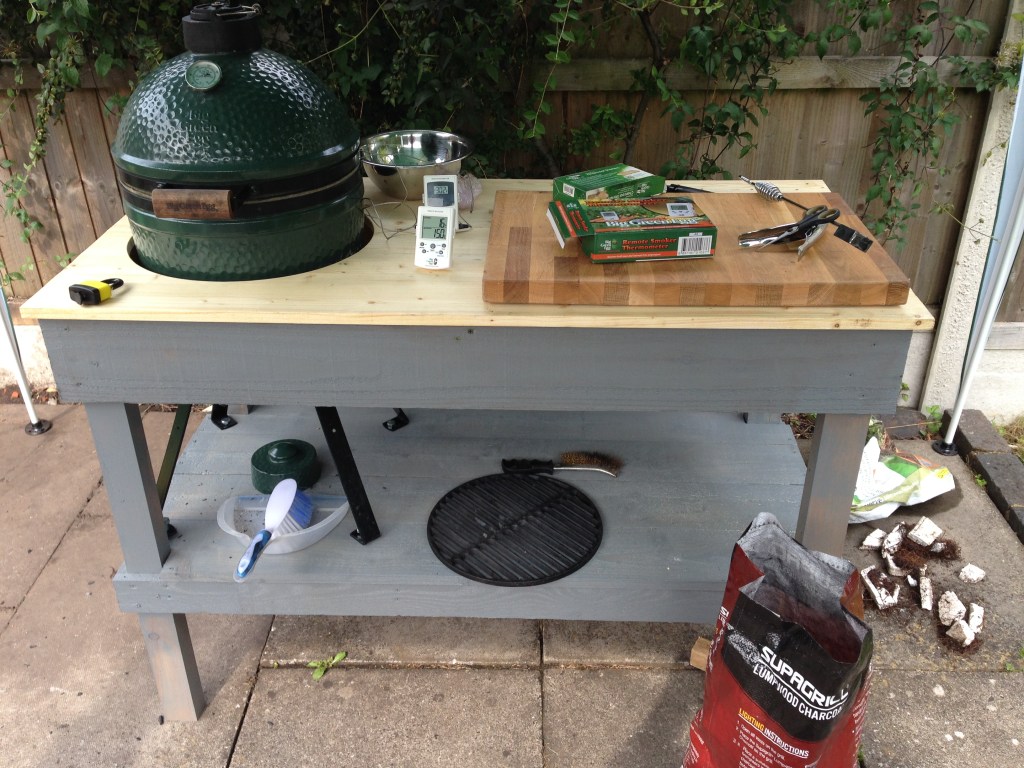
The top got 3-4 coats of clear exterior varnish and the table itself a coat of grey Dulux Weathershield. Probably needed a second, but cooking needed to be done.

It’s stood for nearly 5 years now and is brilliant. Having the prep space is really handy and the shelf has plenty room for charcoal, cooking surfaces, starter chimney and other paraphernalia. I bought a generic BBQ cover for it from Homebase which isn’t perfect, but is good enough. A key modification was the addition of a bottle opener on one leg. If I was going to do it again, I probably would have gone for more sturdy timber for the top. It’s split along the joins at the ends a bit (nothing catastrophic) so thicker timber might have given more glue surface to prevent it – maybe scaffolding boards planed and sanded smooth would do the job. The finished top is 1350mm x 650mm so it wouldn’t be astronomically expensive to get an off-cut of granite to replace the timber, although getting the hole cut would no doubt add to the cost. The table frame is certainly sturdy enough to take the weight.

This was, all in all, a marvelous project to complete together and has left me with a great set of memories of the day of manufacture. I think we allowed ourselves a congratulatory beer afterwards and every time I use the Egg I am reminded of my old man, which is lovely.

Happy Father’s Day Dad!

Post March 29th fun

Until I had my first glass of beer at Tom and Grace’s house, I’m not sure I had really appreciated or comprehended the extent to which I missed the simple pleasure of the company of other people. Sure, I am back at work and see friends from there all the time, but conversations tend to be about work, and that work is getting pretty stressful for all of us in the absence of proper exams for the students in the summer. Sitting around, shooting the breeze and, later on in the night, singing along to Piano Man (loudly and badly) were all things that made me very happy indeed. Suffice it to say the following day was a write off.

Since then, we have hosted 2 separate sets of people for a BBQ (in suitable numbers and suitably socially distanced of course) and have visited Polly’s mum and my parents. It has been joyous. I’ve cooked a whole load of stuff on the Big Green Egg, some of which I have written about before but I did do 2 new dishes.

One was a roaring success, the other wasn’t.

Beef BarbAcoa

Now I don’t say this lightly, but this is one of the best things I’ve cooked on the Egg. The origins of the dish are in Mexico where the whole head of a cow or pig would be cooked in the ground protected from the earth by large leaves. In many ways, it is pretty similar to the Braised Ox Cheeks I’ve made before and follows a similar process to many braised dishes in that the meat is smoked for a couple of hours before being finished off covered in some kind of liquid. I used Ox cheeks but you could use pigs cheeks, or brisket, or short ribs, or Boston Butt I’m sure.

Ingredients:

  • Ox cheeks – 1 cheek for every 2 people seems about right
  • Dried chillies (I used Ancho, Chipotle and Guajillo from Cool Chile Company)
  • 2 onions
  • 3 carrots
  • 2 celery sticks of celery
  • 3 cloves garlic
  • 1 large spoonful of Chipotles in Adobo
  • 500ml Beef Stock
  • A dry rub of your choice
  • Salt & Pepper

To begin with, set your Egg or smoker for indirect cooking at about 125C. You can use any kind of smoking wood you like I reckon, but for this I soaked a handful each of whisky barrel oak and hickory chips for about 45 minutes before cooking.

Add a good beef rub to your Ox cheeks – I used Angus and Oink Moo Mami – and let them sit for half an hour to let the rub stick nicely. Once you are ready, drain your smoking chips, add them to the fire and put your cheeks directly onto the grate for a good couple of hours.

As the 2 hour mark is approaching, roughly dice all the vegetables and sweat them gently in a pan (which will ideally be transferrable to your Egg later) for 5-10 minutes. While they are sweating, take your dried chillies and dry-fry them in a heavy frying pan or skillet for a couple of minutes each side – this will soften them and make them more pliable. Let them toast a bit as this will add an extra layer of flavour. Once you are happy with them, take them off the heat and slice them open to release the dried-out seeds from inside, then shred them as finely as you can with your knife and add them to the veg. To this pan add a big dollop of chipotles in adobo and give everything a good stir.

Check your Ox cheeks – they should have developed a good colour and if you poke them with a skewer (or newly acquired BBQ Fork) they should be feeling reasonably tender. For the final braising, I used a nice terracotta dish which fits my Egg perfectly as I don’t have a skillet that fits so I transferred the sweated veg into it and laid the cheeks over the top. I then poured in the beef stock. 500ml was the perfect amount – it covered all the veg, but didn’t encroach onto the cheeks themselves. I covered the dish tightly with foil and plonked it back in the Egg where I left it for a further 4 hours. They are done when they offer zero resistance when being probed – whatever you use should slide effortlessly through the meat.

Take the dish out of the Egg and carefully lift the cheeks into another dish, keeping them covered with foil while you finish off the sauce. Basically, this is made by blending down the vegetables and the cooking liqour from the braising dish. I used a mouli-legumes for this as I find it very effective at filtering out the tough bits of dried chilli which can remain. You can use a stick blender to achieve the same result, but it might be worth passing the whole lot through a sieve before the next stage just to be sure. Check the seasoning and add salt and/or pepper if you think your sauce needs it. The finished sauce should be pretty thick so it might need to be reduced over a high flame if it’s too liquid.

Go back to the cheeks and, with 2 forks, shred the meat, pour over the sauce and mix well (but carefully – it’s nice to keep some biggish chunks). The finished result is sensational in taco or wraps. I made some flatbreads with yoghurt and self raising flower which worked well. Add a big spoon of your Barbacoa to your flatbread and top it off with coleslaw and a bit of guacamole, finishing with a squeeze of lime.

Hot Smoked salmon

If you indulge in as much web-based research as I do on the subject of live-fire cooking, then I am sure you will have seen people doing hot smoked salmon where they have a whole side of the fish nailed to plank of cedar wood next to a lovely fire of Birch logs. I’ve done quite a bit of cold-smoking of salmon so I was quietly confident I could replicate the efforts of Bawden, Mallman and Bray et al.

I started as I always do by curing the salmon in the fridge for 24 hours in a 50:50 mixture of salt and sugar. I just sprinkled a thin layer over the fish (thinner still over the tail end) and vacuum-packed it all up. This draws some of the moisture from the flesh and helps to keep it safe for eating later. When it’s finished curing, the flesh should be noticeably firmer to the touch. I then rinsed off the remaining cure under the cold tap and patted dry with kitchen paper.

I took 5 oak dowel pegs which I whittled into sharp points and then drilled holes into my cedar plank to accept the pegs. After soaking the wood in water for half an hour, I then carefully pushed the salmon down onto the spikes and painted on a mustard and dill glaze which I adapted from the Niklas Eksted book “Food from the Fire”. A few years ago I upcycled the drum of an old washing machine to use as a kind of brazier and it was in this that I prepared my fire and constructed a Heath-Robinson system of poles and hooks to hold the cedar plank in place.

Now at this point I was very much shooting in the dark. I started with the thicker end of the salmon at the bottom, nearest the fire and after about 20 minutes I gave it a poke and found it was barely warm, so moved the plank nearer the fire. The plank immediately caught fire so I turned the whole thing upside down so the tail end was now at the bottom. I played about with the angle of the board and after 45 minutes in total reckoned it was probably done.

It wasn’t.

Because it was already cured, it still tasted pretty good and the flesh that came from the end that caught fire was really nice; firm and cooked through with a nice hint of smoke. The moddle section was warm, but still very soft. Not unpleasant, but not amazing either.

I think I needed to be braver – I was worried about overdoing things, but there is a lot of moisture in fish and so bringing it nearer to the flames would produce a better result. Building a bigger and hotter fire in general would be important too I think. Certainly, my cedar plank and spikes have got plenty of life left in them, so at some point in the future I’ll give it another go and report back on how it went.

Alex Pole Ironwork

Well, here’s a thing. Or rather two amazing things. I’ve written before about some of my more negative experiences of social media, but there is no doubt that it can be a great way to connect with like-minded people and, via Instagram, I came across Alex Pole Ironwork; a blacksmith based in Somerset.

I’m a great admirer of skilled craftspeople and looking through Alex’s feed and clicking through to his website it is clear that he and his team have skill in abundance. Their USP is that everything they make is forged by hand, meaning that it starts as a solid steel bar which is then heated and hammered into the finished article. They do pots, skillets, utensils, skewers and a whole host of other kit that the discerning BBQer will gaze upon and think to themselves “Here are many objects I desire greatly”.

Everything is beautiful.

Now since I am a chap possessed of a degree of financial prudence I did reign myself in a bit and had a look at what I NEEDED rather than merely WANTED. A good set of tongs were top of my list since the Morrisons ones we used all the time had died an untimely death. I had also been looking at the meat hooks Argentinian Asadors use to turn their mighty steaks so the BBQ fork also caught my eye.

At the time, everything was out of stock which I took to be a good sign as, after all, handmade items take longer to make I guess, so I checked back every couple of days with fingers firmly crossed. Once I’d ordered, the package arrived in 3 or 4 days just, as luck would have it, in time for our first BBQ guests following the March 29th emergence from lockdown restrictions.

They are amazing – a great blend of form and function with a really weighty heft to them. The tongs are excellent – nice and long to keep my hand away from the fire but still allow deft control of whatever I am cooking be it flatbreads or courgette slices. The design is great with no moving parts to go wrong, no spring to ping out at an inopportune moment. The fork is beautiful. You can see every hammer blow the smith has made which will surely make each one unique in its own small way. It does what I wanted it to do; a 1.2 kilo rib-eye was flipped with ease and sausages turned with no fuss. A nice finishing touch is the leather thong that you can use to hang it up with.

Not only do they look great and perform brilliantly, I have had fun arranging the fork and tongs in different ways to photograph them for this post so they resemble a kind of BBQ Deathly Hallows. Although not imbued with the ability to turn me invisible or re-animate a loved-one they are fantastic pieces of kit which I will appreciate each and every time I use them.

They are going to last me a lifetime I’m sure…

Shawarmarama Chicken Tacos

Ingredients

  • Chicken thighs (I got mine from Philip Warren online butchers)
  • Angus & Oink Shawarma rub
  • Belazu Shawarma paste
  • Lemon juice
  • Sunflower oil
  • Tortilla wraps (I like the small ones, but big ones would work just as well)

It all got a bit noughties food fusion here this week as I merged middle eastern Shawarma flavours with Mexican street food. This made a great after-work meal – as quick and simple as Forrest Gump – but you can do as much chicken as you have room on your grill to serve at a suitably social distanced gathering in your garden of up to 6 people (as long as you are reading this after March 29th 2021).

For 2 people, marinate 4 good sized boned chicken thighs with Belazu shawarma paste, Angus & Oink Shawarma rub, a glug of sunflower oil, a squeeze of lemon and salt and pepper. Cover your bowl with cling film and rest in the fridge while you light your Egg/Smoker/BBQ/Griddle, aiming for a pretty fierce heat (250C or so). I used the cast-iron grate in my Egg as I was keen to get some really good black bar marks on the chicken.

While your grill is heating up, make a portion of Cabbage, Carrot and Chiplotle Coleslaw which I’ve covered in a previous post – this will be one of the veg elements in your finished tacos.

When you’re ready, put your chicken thighs onto your grill and resist the temptation to move them for a good few minutes; this will help develop the grill lines we’re aiming for. One way of judging when to flip is when the meat stops sticking to the grill (I guess there’s some Maillard-related science to this where proteins denature and change shape). Once both sides have had 2-3 minutes, you can flip them more frequently. More flips = more grill marks = more deliciousness. After a few turns each side, give the fattest part of each chicken piece a poke with a meat thermometer. You are aiming for 75C to make sure it’s safely cooked. If you don’t have a meat thermometer, you can just slice through the fat part and see how pink it is. If it’s pink, keep on cooking…

Once you are happy they are done, take the thighs off the grill and cover with foil to rest.

Now take your chillis, remove the grill and drop them directly onto your embers. The aim here is to blacken them all over but not to cook them so much that they lose their texture. To achieve this, they need to be turned frequently and you either need long tongs or a heat proof mitt. Or both. It only takes 4-5 minutes and when they are done, take them off and rest them on a plate. While they are resting, put your grill back over the fire and warm your tacos through – this will take only 30 seconds each side. Any longer and you will get a blackened frisbee; it will still be delicious, but harder to wrap into the finished product. After 5 minutes or so, the blackened skin of the chillis should peel away pretty easily and once you’ve got it off, chop the stalk off, slice each one in half, scrape the seeds out and chop into smallish chunks. Slice your chicken into bite-sized pieces.

Build the tacos by layering the coleslaw, then the chilli, then the chicken. If you have it, top them off with a bit of green coriander and maybe a squeeze of lime. Roll your sleeves up, because they are JUICY! If, as I am, you are the proud wearer of a beard then paper towels are a must. If you have children, make sure you have a hanky up your sleeve that you can spit on and wipe their chops with afterwards (do people still do this or was it just 70’s Mums that built this skill at Mum school?). All in all this was a great meal which was fun to cook and delicious to eat. From raw ingredients to full, satisfied tummies was no more than an hour which might a stretch for some on a school night, but would work brilliantly for the Fam while watching Saturday Night Takeaway…

While you are here…

…I have a favour to ask.

I have found the process of writing this blog a very cathartic one. It’s taken my mind away from the stresses and strains of COVID, lockdown and work and has focussed my weekend attention on meal planning and trying to take better food pictures. I hope you’ve enjoyed reading what I have written. Having done as I intended and set up an Instagram and Twitter account, I have felt the incessant lure of social media and, like the Millennium Falcon caught in the Death Star’s tractor beam I am being dragged further in. I’m not sure I like it. It’s nice to get a good comment or two, but it is less fun fighting off the junk messages, the scammers and the trolls.

I’d like to build up this site a bit more – I’m in control of what is here and I would like to be less reliant on other platforms. I’m not looking to turn any profit or start a new career as an influencer but writing is making me happy, less fraught and a bit calmer. I hope it’s not too narcissistic to hope that a few more folk will read what I’ve written. To that end, once you’ve finished reading this can I ask you to follow the site – scroll to the bottom of the homepage and enter your email address. Each time I post something new, you’ll get a notification in your inbox. If you have friends or family that like food, maybe it wouldn’t be too much of an imposition to share the site’s URL with them.

Happy cooking and grazie mille,

Sam

Lamb Raan

I love a curry.

The old staples of tikka masala, garlic naan and bhajis were always my favourite and as a family we got a takeaway every Friday to the point were they knew us (and our order) by sight. Having munched our way through a massive range of Indian cuisine in nearby Birmingham (The Indian Streatery, Lasan, Indico, Indian Brewery etc.) Polly and I have concluded that Asha’s and more specifically their President’s platter is really where it’s at. The platter is basically a giant sharing dish with tandoori chicken, gargantuan prawns, lamb cutlets, sheik kebabs and a load of delicious sauces and pickles. The centrepiece can be either a lobster, or a slow-cooked spiced lamb leg. It is amazing and is one of the main reasons why I cannot wait for restaurants to open again; it’s a proper special occasion dish. Fair warning – to get the best out of the meal, don’t eat for about 3 days beforehand. They also do an extraordinary cocktail called the Chairman’s Special which is a Cognac base, with a load of spices added and then flamed just before serving at the table – magic. Just before the pandemic, a branch of Dishoom opened on the edge of Chamberlain Square, opposite the Birmingham Museum. We’d been to the one in King’s Cross a couple of times and loved it and managed to get into the soft opening. Among the many dishes we ordered, we opted for the Lamb Raan which is not dissimilar to the lamb on the President’s Platter. Quite lightly spiced and fall-apart tender it was really good and there was a lot of it, which meant that we took a load home with us when we eventually rolled out feeling like Cool Hand Luke after winning his egg bet.

Now this isn’t a restaurant review, but the above is an important bit of background into what I cooked this weekend. The intention was to recreate the lamb centrepiece from the President’s Platter, but to put a bit of a smoky live fire twist onto it. I got the Dishoom cook book for my birthday last year and Lamb Raan is in it so that’s where I started. The book is a very lovely thing indeed, especially the opening chapter called “Welcome to Bombay” which is beautifully written and a very evocative account of the city and its food history.

It’s a dish that needs a lot of time, both for marinating and for cooking but as with most recipes of this kind, the actual contact time for the chef is relatively short. You need to get marinating the day before you want to eat. For Big Green Egg owners, doing lamb low and slow usually means a shoulder joint, but Lamb Raan is based on a leg. I admit I was a little skeptical at first about whether I was going to be able to achieve that unctuous pull-apart tenderness of lamb shoulder, but it works and the results are really good. Sometimes I feel there is just a little too much fat in a shoulder, so the leg makes a nice change and produces a pile of firm, juicy meat with a lovely bite to it and without the blobs of fat. You’re going to need a dish or a pot that you can get your whole lamb joint in. If it has a lid, great, if not then foil works just as well.

Let’s assume we’re having this for Sunday lunch…

Saturday Morning

Pat your lamb leg dry with kitchen paper and give it a few deepish slashes in a grid pattern to help the marinade get in. Mix together a couple of teaspoons of salt and the same of chilli powder and sprinkle this all over your lamb, working it into the slashes with your fingers. Rest back in the fridge for about half an hour. Meanwhile, make a paste of garlic and ginger and when your 30 minutes is up, massage this in over the top of the chilli and salt mixture. Cover the whole lot with cling film and return to the fridge for up to 24 hours – the longer the better.

Sunday Morning

Work backwards from the time you want to have lunch. The dish takes about 5 hours to cook, so I reckoned I wanted to start cooking about 8:30. My Egg takes about 30 minutes to settle down for low and slow cooking so I set my alarm for 7:30. Take the lamb out of the fridge, but keep the cling film on while it wards off a bit of the early morning chill. Adjust the vents and aim for a dome temperature of 150C. For the first part of the cook, Lay the lamb on the bars and let it smoke with some apple chunks for about 45 minutes. While this is happening, gather together a couple of bay leaves, 4 cloves, a teaspoon of whole peppercorns and squash a few cardamom pods with the flat of your knife. Measure out about 75ml of malt vinegar and boil a kettle.

Pre-heat your cooking pot to prevent your Egg temperature from dropping when it goes in. To the pot, add the smoked lamb, the spices and vinegar. Pour in enough boiling water to come about half way up the lamb – be careful to pour towards the edge of your pot as you don’t want to wash off the marinade by mistake. Cover the pot with its lid or foil and put it back in the Egg for about 3 and a half hours. Check every 45 minutes minutes or so and add a bit more water if the level has dropped down. You’ll know it’s ready when the leg bone pulls out without much resistance. Once it’s cooked, take the pot out and leave it to rest still covered.

When rested, take the lamb out of its pot and shred/chop the flesh. Pour the cooking liquor into a jug, sieving the spices out as you go. Put the shredded lamb back into the pot and then add the liquor to it a little at a time, tasting as you go until you are happy. You can put in a dash of lime juice if you like; I’ve added pomegranate seeds in the past which give a nice fruity hit but you don’t need them.

Polly makes a great carrot, pea and potato side dish to go with the lamb and it goes brilliantly with naan bread. Onion bhajis are a must (make them yourself if you can). If you are feeling really jazzy, knock up a flaming cognac cocktail too…

Leftover Beef Chilli

A little while ago, I made a massive slab of beef rib which, despite us piling into it as though it might be the last meal we had in this life, resulted in a substantial amount of leftovers. It’s usually one of the benefits of cooking big joints and it tends to mean that you have a load of beautiful, smoky meat to repurpose into to something else. It’s good home economy too. Good produce is more expensive, yet worth saving up for and the more meals you can get out of your joints the better. The recipe below made enough for 2 meals for 2 people although it could be eked out further by adding more veg I guess. I just didn’t have any in the fridge at the time.

I decided to make a chilli, although perhaps more of a minimalist take on the theme, rather than something full-on like the recipe for Hillbilly Chilli in the Grillstock book. In it, they add bourbon and black treacle to give real dark depth to the dish and I wasn’t sure if I fancied that today. In the end, Polly found a recipe for vegan chilli with a great spice mix and I basically swapped out the beans for leftover beef; we were keen to avoid any repeats of the infamous Blazing Saddles scene.

  • Leftover beef (I had about a kilo)
  • Leftover gravy
  • 2 onions
  • 4 garlic cloves
  • A glass of red wine
  • Beef stock
  • A tin of tomatoes
  • A tin of kidney beans (if you want them)
  • 0.5 tsp chipotles in adobo
  • 1.5 tbsp Smoked Paprika
  • 1 tsp chilli flakes
  • 1 tsp cumin seed
  • 2 tsp dried oregano
  • 1 tsp ground coriander
  • 1 tsp ground cinnamon

To begin with, I trimmed the vast majority of the fat from my beef slices. The lean meat was roughly chopped into smallish chunks and kept to one side. I kept back a couple of slices of fat and cubed them; these got added to the pan on a very low heat. The idea was that it would render down a bit to give me something the fry the onions and garlic in and add a bit of smoky flavour right from the off. Once I had enough rendered fat, I fished out the chunks that remained and discarded them.

The roughly chopped onions went in, still on a low flame. I wanted them to caramelise. Once they’d softened, the garlic was added and both ingredients ticked over until I was happy with the colour. I tipped in all the spices and stirred them around for a good 5 minutes to cook off a bit or their harshness. After that, the cubed leftover beef, again stirred around to get everything coated in the spicy onion mixture. If you want beans in yours, now is the time to add them – a standard 400g tin will be just right.

Since I had an open bottle of red hanging around, I used it to deglaze the pan and gave everything a good stir to release the dark brown bits that had burned on to the bottom. To this, I added about half a teaspoon of chipotle paste; I love the heat and smoke aroma you get from this luscious ingredient.

Next came the tinned tomatoes and enough beef stock to fill the pan to within about 1cm from the top (its best if your stock is already heated up, like when you make a risotto). On went the lid and the flame was turned down to as low as it could go. I left mine to simmer away for about 3 hours, peering under the lid every once in a while to check the liquid level.

The anticipation in the house was palpable.

When we could stand waiting no longer the pan came off the hob; the stock had cooked down to a lovely consistency and the whole thing smelled amazing. I added a pinch of salt and a good lot of pepper to supplement the chillies as, if I was doing this again, I’d like a bit more a chilli punch than what we got here.

I used mini soft tortillas to make tacos. The tortillas got a quick scorch on both sides in a hot, dry pan to limber them up a bit and then I added a fresh, crunchy cabbage and carrot chipotle coleslaw, a leaf or two of coriander and a tiny squidge of fresh lime. Honestly, I reckon I could have hoovered up the entire packet of tortillas and the whole pan of chilli they were so good. A degree of self-restraint prevailed and so we had the rest a day later with a bit of rice on the side. It was just as good.

Recipe: Cabbage, Carrot & chipotle slaw

This is our go-to coleslaw recipe when we’ve got folk round for a BBQ; the following ingredients make a big bowlful:

  • 1 Hispi cabbage
  • 4-5 carrots depending on how big they are
  • Pomegranate seeds (optional)
  • 2-3 tbsp mayonnaise
  • 1-2 tsp chipotles in adobo

This is easy-peasy lemon squeezy to make. Peel your carrots and grate them into a bowl. Strip the outer leaves from your cabbage and cut into quarters. You can grate it too if you have a good food processor but like Beatrix Kiddo against the Crazy 88 I prefer to do my shredding by hand. Add your cabbage to the bowl and give it a good mix with the carrots. To this add in a dollop of mayonnaise and a teaspoon or so of the chipotle paste depending on how much you like heat. At this point, you can also add pomegranate seeds which add a lovely fruity pop to each mouthful and work especially well against the meaty depth of the beef. If you don’t have them, then leave them out. Now you can adjust the taste – add salt and pepper, plus a bit more mayo or chiptole if you think it needs it. It goes really well in the tacos, but is equally good as a side or on top of burgers or bratwursts.

Forerib of Beef

There’s a great section in the book “Salt, Fat, Acid, Heat” by Samin Nosrat in which she describes the beneficial effects of salting joints of meat before you cook them. One could read it and think her advice a little counter-intuitive as, after all, we want juicy, succulent steak and the action of the salt draws moisture from the fibres. However, she explains that salt alters the shape of the proteins so that more water is retained when heat is applied. Samin also describes how salt diffuses evenly through the meat as long as you give it enough time to do so, enhancing the flavour when it is cooked. I gave this 3.2kg joint of beef fore rib a good sprinkle of Maldon flakes the night before, covered it in cling film and put it back in the fridge.

A small amount of salt applied in advance will make a much bigger difference than a larger amount applied just before serving

Samin Nosrat

The joint came out of the fridge about 3 hours before I wanted to cook. The salt had drawn some moisture out of the beef, not a massive amount, but it was evidence that it had done its job. I then gave it a light covering of the Angus and Oink Moo-Mami rub using a bit of French’s yellow mustard as the gluing agent.

The Egg was set-up to cook indirectly, with the plate setter in and a target temperature of about 120C. The joint had a generous layer of fat round the outside and lovely marbling through the meat, so I wanted to be sure that it cooked for long enough to render down a bit to stay juicy and delicious. I pre-soaked a handful of beech chips a long way ahead of time as I really wanted them to keep giving up a good level of smoky flavour for as long as possible. I chose beech as it tends to be a bit less harsh than hickory and although I wanted a good smoke flavour, I was adamant that it not overpower the beef.

I stabbed the Meater+ probe deep into the beef and plonked it into the Egg, directly on the grate. I’d guessed it would take around 3 hours from start to finish which gave me quite a lot of time to try to look busy and important whilst Polly got on with the vegetables. She did us proud; braised red cabbage, roast potatoes and an amazing swede and carrot not-quite mash, not-quite puree. She also made the base of a sauce by making a reduction of red wine and balsamic vinegar flavoured with garlic and rosemary.

The Meater told me to take the beef off the heat when it had reached 43C and gave a resting countdown of 40 minutes to progress to the final target temperature of 52C. There’s a lovely sort of intangible benefit of using this probe as it allows the chef(s) a clear window of opportunity to get all those last minute jobs organised so the table is set, the plates are warm, aperitifs served and wine decanted. Although we can just about catch a glimpse of the end of lockdown, it remains a seemingly enduring state and in our house at least it is good to observe the niceties, even if you haven’t actually got mates round to share a good lunch with.

I’m annoyed with myself and failed you, dear reader, for not getting some pictures of the beef as I carved it. It was sensational. I think it is not possible to over-estimate the quality of the meat in the first place; I can’t recommend Philip Warren enough. Their produce is top notch and their customer service impeccable. The process of pre-salting gave the flesh a delicious, savoury, beefy flavour. It was beautifully, uniformly pink, the fat soft, wobbly and unctuous (Polly and I are the opposite of Jack Spratt and his wife). The beech had imparted a lovely, subtle, slightly sweet flavour. The Moo-Mami gave a burnished, savoury crust and was well worth adding. I carved it in great thick slabs whilst lamenting that we couldn’t share this amazing feast with our nearest and dearest.

I’m already planning what to make out of the substantial leftovers.

Recipe – Polly’s Red Wine Sauce

This sauce is a cracking alternative to those more traditional gravies made with the fat left in the roasting tin and thickened with flour. If you have gluten intolerant acquaintances then this is just the ticket. You need:

  • 50ml balsamic vinegar
  • 400ml red wine
  • 400ml beef stock
  • 3 fat garlic cloves
  • 2-3 sprigs of rosemary
  • A couple of knobs of cold butter
  • The resting juices from your beef

This is a sauce made in 2 stages; the first one can be done ahead of serving time to reduce the amount of last minute faffing. In true TV chef style, have all the liquids measured out before you kick it all off. Start with the balsamic and add it to a good-sized pan over a highish flame. Let it come to the boil and watch it carefully as it reduces down by about half. At this stage, roughly crush the garlic cloves with either the heel of your hand or the flat side of a heavy cooks knife and add these, with the rosemary to the pan. To this, add the wine and give everything a quick stir to mix it up. Turn the flame down a little as you want a more gentle heat to help the flavours all infuse with one another as you let the liquid gradually reduce by half again. Now add the beef stock and let this reduce by half once more. It will be smelling amazing at this point but now the beef stock is in, you might need to do a bit of judicious skimming to remove any froth or scum from the surface. Once you are happy, fish out the garlic cloves and rosemary. Stage 1 is now complete.

Stage 2 begins after the point you take your beautifully smoked and roasted beef joint out of the Egg. Bring your sauce base back on to the heat and let it gently simmer away on the lowest of flames whilst you wait for the resting juices to find their way out of the relaxing beef. Just before serving, pour these all into your sauce. At this point, some adjustments might be needed so turn the flame up if you want the sauce to have a bit more body (think unwhipped double cream consistency) and taste it to check for seasoning. Because it is a reduced sauce, go easy with the salt and add just a touch at a time until you are happy. Pepper works for me as I like the bit of oomph it gives. Lastly, take the pan off the heat and add 2-3 knobs of cold butter, straight from the fridge. This will give a last-minute extra thickness and butter obviously makes everything taste just that bit more delicious. James Martin says so and who am I to disagree with him.

Again I will remind you about the need for a warm gravy jug so make sure you put it in the oven when you’re warming the plates, or fill it with boiling water for 5 minutes. You’ve spent all this time making an amazing sauce, so don’t mess it up by letting it get cold now by omitting this final step.

Braised Ox Cheeks

If you’re feeling a bit glum about the world, then I can only recommend this dish as a means of improving your mood. It’s a piece of cake to make and, although it takes a long time overall, for the chef it’s mostly waiting around for things to happen.

The recipe is essentially made like a good old-fashioned stew, of the kind you can find in any Mrs. Beeton style cookbook of a certain age. Below is a list of what I used. I would say onion and carrot are necessary, but beyond these but you can roll with whatever you have in your larder: 

  • 2 Ox cheeks 
  • 2 onions 
  • A leek 
  • 2 carrots 
  • A glass of spicy red wine 
  • About 500ml of stock – I used veg, but beef would probably be even better 
  • A couple of rosemary sprigs 
  • A couple of bay leaves 
  • A couple of thyme sprigs 
  • A dash of Worcestershire sauce 
  • A dash of cider vinegar (optional) 

Where the recipe differs from a basic stew is that the cheeks get a good hour of smoking before the braising part. To kick it off, I took the cheeks out of the fridge and gave them a liberal shake on both sides with some Braai salt; this both imparts a bit of flavour from the spices in the salt, and helps the meat to stay juicy and tender once you have cooked it. Unlike a dry barbecue rub, this will not make a crust or bark on the outside of the meat. The cheeks went back in the fridge overnight. 

In the morning I pre-soaked a handful of hickory chips in water and lit the Egg with the plate setter in for indirect cooking, aiming for a dome temperature of 150C. The chips went onto the hot coals and the slabs of ox cheek directly onto the bars. The intention here was not to cook the cheeks through, but to impart a deep, smoky flavour before getting to the braise phase. I left them for an hour or so until the hickory chips had burned off, which was a shame because there was a beautiful smell about the garden and which wafted out once I opened the Egg to see what I had created. The cheeks looked rather good, with a chestnut brown colour from the smoke. To the touch, it was clear the fibres had all tightened up and were looking forward to a relaxing soak in a strongly flavoured braising stock. I took them off the heat, dropped them into a bowl and covered loosely with foil. 

Meanwhile, I prepared the ingredients for the braising liquor. I’ve got an ancient Le Crueset casserole that is perfectly sized for the Egg, so in it went onto the bars with a good scoop from a jar of beef dripping. The onion, leek and carrot got diced and added to the pot, along with a couple of bay leaves tied around some sprigs of rosemary and thyme. Making this kind of parcel with the herbs not only makes it easy to fish them out at the end, but it helps to stop the rosemary needles breaking off, which I find they are prone to do with this kind of long, slow cooking. Once this had all softened down, I added a good tablespoon of plain flour to give the sauce a bit of body as it cooks down. You need to stir the flour into the veg and will all look a bit claggy at this point – do not panic. I’ve got a bit of a Floydian approach to using wine – it is imperative that it is tested in situ then, once approved, gets added slowly until it looks like the right amount; I would guess about 150ml. It is important to stir as you pour to help break down any remaining lumps of flour. At this point I carefully slid the cheeks and the resting juices into the pot on top of the veg and then added enough stock to cover everything. I would have used beef stock for this, but the container I carefully defrosted the day before turned out to have soup in it. I used Swiss Bouillion powder and, to be honest, it worked well. The pot had its lid plonked on, the Egg had its lid shut, and then I needed something to do for 5 hours. Since there was no cricket to watch, we left to go to the OUTSIDE. 

One of the main benefits of lockdown is the extent to which we now know a bit more about where we have lived for the last 6 years. From our house, within about a 15-minute walk we can be in the countryside and on a good day you can see the Malvern Hills in the distance, juxtaposed with the visual delights of the M5. If you close your right eye, you can kind of blot this out though. This was a good day, but the previous 7 had not been so it was biblically and sometimes comically muddy. We returned, rosy of cheek and empty of hip-flask looking forward to seeing what had become of our dinner. We opened the lid with the excitement of the Goonies discovering One-Eyed Willie’s treasure and were not disappointed. 

The cheeks were gloriously pull-apart-with-a-spoon soft. The gravy was deeply brown and had thickened nicely. I took the cheeks out, put the pot on a high flame on the hob and added a couple of dashes of Worcestershire sauce (when in Rome and all that). With a rich sauce like this, I also like to add a smidge of vinegar as it helps to overcome any residual fattiness that has cooked out of the beef, although you can leave this out if you want. I left this on the hob for about 5 minutes, bubbling fiercely to reduce it down to that “coat the back of a spoon” consistency that is often cited by earnest TV chefs. Once I had it, I adjusted the seasoning. I pulled the cheeks into big chunks and put them back into the sauce. 

We ate it with a good mashed potato and some cabbage. It was delicious and fulfilling. Although in my previous posts I have lamented not having friends or family round to have a meal with, but on this occasion, I was able to have guilt-free seconds. 

Braised Fennel

Braised Fennel

OK, I know. This is a bit of a cheat in that this is cooked on the hob and not over what one might strictly term live fire. In my head it can be argued that all fire is live to some extent and just because I’m using gas and not charcoal doesn’t make this delicious veg dish any less valid. It goes with pretty much any fish but is just as happy accompanying the Sunday lamb leg or chicken. My personal favourite is as a side with slow-smoked rosemary, garlic and anchovy marinated lamb shoulder.

The great thing about this recipe is that it scales up and is limited only by the number of fennel bulbs you have and the size of your pan – your pan will ideally have a lid, but you can use a baking parchment cartouche that will work just as well. For this cook I used the following:

  • 3 fennel bulbs
  • About 200ml Vegetable or chicken stock
  • A good knob of butter
  • A glug of pastis

Trim the stems off the tops of the fennel, keep hold of them for the time being. Slice the fennel into wedges through the root as this will help to hold them all together as they cook.

Heat your pan over a medium flame and add oil. Once up to temperature add the fennel wedges with the cut sides down. The aim here is to get a bit of caramelisation on the edges, but not too much. Think Werthers original rather than bonfire night toffee when you are turning them to do the other side. Don’t crowd the pan; you can do this stage in batches if you need to. Keep a close eye as the wedges can colour quite quickly.

Now I am fully aware that pastis is not everyone’s cup of tea and some hold the view that it should only be touched by elderly French chaps in berets and neckerchiefs as a warm up for an intense game of pétanque. However I love it and adding a good slosh to deglaze the pan definitely improves the dish in my view. Maybe not enough to shell out about £20 on a bottle that will then be doomed to lurk, unloved and untouched in a dark corner of your drinks cabinet in perpetuity but if you have a sticky bottle of impulse buy duty-free Pernod or Ricard floating about, now is it’s time to shine.

Once the alcohol has burned off, add enough stock to the pan so it comes about a third of the way up the fennel. I usually use Swiss Bouillon powder to make about 200ml for this which is great but can be a bit salty to my palate so be careful with seasoning at the end. Now add a couple of big knobs of butter. As the fennel cooks the butter will combine with the stock and, as it reduces, you will be left with a lovely, glossy, aniseedy, sauce. Put the lid on at a jaunty angle to let the steam escape more readily, or carefully place your cartouche over the veg. Adjust the flame so the stock is just simmering and let it bubble away for anywhere between 20 and 30 minutes

Meanwhile, back to the fennel tops. If you are lucky, your fennel will have vivid green feathery fronds growing out of the periscope-like stems which you can strip and finely shred. It’s a bit of a faff but like the pastis, adding these raw just as you serve does improve the flavour and gives a bit of added colour. If you don’t have fennel with these extra bits don’t worry. The thick stems are great in a stock, particularly a fish one.

The fennel will be cooked when the tip of a knife will slide easily into the root. The beauty of this dish is it’s just as delicious whether you leave the wedges with a slight bite or let them go to a softer stage. Season to taste – pepper is good, just be wary of the saltiness of the reduced stock.

The Big Green Egg

We got our Egg 6 or 7 years ago. It’s amazing. Because it’s just the two of us, we decided to go for the small version – this gives us a 33cm grill which is perfect. We’ve had garden parties with 20-odd guests and always had enough room to cook, albeit with some forethought and planning around what needs to go on when. I have cooked pretty much every meat, fish, seafood and veg,. I’ve grilled, cooked low n slow, high temp, planked, hot smoked, cold smoked, done caveman style and made pizza.

I love it.

It’s big decision to go for any Kamado style grill as there’s going to be a considerable cash outlay – ours cost £850 and that is the low end of the market. For our money, we got the Egg, a “nest” with wheels, the plate setter, a pizza stone, the cast iron searing grid, the normal grill, and a grill gripper. We got it from Dart’s Farm near Topsham and they chucked in a couple of bags of charcoal and some firelighters.

So why get one? It’s think it’s probably fair to say that you can kind of replicate the way an Egg works with a decent kettle BBQ for less than a quarter of the price, but there is no doubt that there is there is just something “more” about the results when you’ve set your fire and closed your ceramic lid. It’s easy to light, gets up to temperature quickly and it’s really easy to control. It’s incredibly efficient and I find useable charcoal left over even after an 8 hour cook. In my view, the plate setter is a must as it’s this ceramic heat deflector which makes your Egg truly flexible; stick it in and your Egg is a responsive charcoal oven for baking and roasting. Take it out and you can grill over Mount Doom temperatures. Unlike a kettle BBQ, you don’t have to faff about with water pans and 2 zone cooking, although I for Weber owners I guess this is all part of the fun.

There have been a few occasions when I’ve wondered whether we should have gone for the next size up. I’d love to have a crack at doing a full brisket or a massive Jacob’s Ladder of beef ribs, but they just won’t fit. When we’ve got a load of folk round (remember those days?) it would be handy to be able get a few extra burgers on the go so there’s less of a wait. I won’t ever be able to do the Christmas turkey in our egg. Christmas chicken just doesn’t have the same ring to it. Despite all of this, the small IS the right size for us. I think if you’re a family, particularly if your children are teenagers you’d want to be looking at the medium at least.

BGE have replaced the old small size with a version called the MiniMax. It has the same grill diameter as the small and is 15kg lighter at 35kg comes with a kind of carrying frame which makes it way more portable. If we were in the market for one now, this is what I would go for. I think.

If you decide to take the plunge, I don’t think you’ll regret it, but you may well have to send one of the aforementioned teenagers out into the world of work or sell a non-essential kidney or two to finance it all.