I have a friend called Guy who is a very good chap to know indeed. Amongst other things he is a very keen apiarist, which means that every so often he drops round large quantities of honey that his bees have produced. He is also the kind of bloke who gets a massive venison haunch for his birthday. A while ago we talked about him bringing it round so I could cook it, and a couple of weekends ago we did exactly that. The joint was bone in and weighed about 2.5 kg – I guess it was from a Roe deer from the size. I did a bit of research on the best way to cook it and, having recently done a Porchetta, I wanted to get it on the Fire Cage rotisserie.
Now, as most folks know, venison is a pretty lean meat and so a cook needs a way of adding a bit of fat to the meat to help to keep it nice and juicy. In the days of Mrs Beeton, home cooks would use a larding needle to make holes in their joints and insert thin strips of fat throughout. Fun though this sounds, this is the one bit of kitchen equipment I am yet to acquire and so I decided instead to make a lattice of streaky bacon to wrap around the whole thing. However, for this to be effective the joint needs to be a fairly uniform shape, and that meant deboning it.
If you haven’t deboned anything before, I will admit that it can be a little daunting at first but there is a great YouTube channel called the Scott Rea Project which is an excellent butchery resource for the home cook. He rather handily has a “How to Butcher a Haunch of Venison” video. The end goal is to “butterfly” the haunch so it can be rolled and tied up in as uniform a sausage shape as possible. Take your time and make lots of small cuts with the tip of your knife and you will get there in the end. Keep all the bones, roast them for half an hour and make a stock out of them. Once you have got your joint butterflied, have a good look at it and make further cuts parallel to your board into any fatter bits so that it lies as flat as possible. Guy had requested chimichurri to serve it with, so I made a load and spread some all over the inside of the meat and roughly rolled it all up.
Now for the bacon lattice. For this joint I used 16 rashers, eight vertical and eight horizontal. Put a roll of cling film at the top of your board and pull down a piece so it lies across your board with a bit of extra at the front. Don’t cut it off at this point. Place the eight vertical rashers, with a little gap between each one from left to right. Now place your first horizontal rasher at the bottom and fold every other vertical one back over it. Place your next horizontal rasher and then return the vertical ones to their original position. Keep going this way, alternating the vertical rashers to make the lattice; you should end up with a rough square of bacon. Place your venison at the edge nearest to you and, grasping the extra bit of cling film, roll the joint away from you until you have wrapped the bacon all the way around. Next try to tuck the cling under the joint as tightly as you can get it and then hold the joint and pull out more cling and keep tightly rolling the venison until you have got 4-5 complete layers. Grasp the extra bits at each side and roll the whole lot towards you to make it even tighter. If there is enough “spare” you can tie off the cling film, but I find it easier to use a couple of plastic clips (the kind you use to keep open packets closed). In all honesty, this is a bit of a faff, but it does help to create the perfect round shape for the rotisserie, especially if you chill it in the fridge for a few hours.
Once out of the fridge, you will still need to tie up the whole thing so carefully remove the cling and use good butcher’s twine to hold it together. I tried to line up my string with each of the vertical bacon rashers, so I made eight knots in total. The time in the fridge does make this a bit easier so is worth it. I’ve written about butcher’s knots before and, if you need a refresher, look up any of the excellent YouTube tutorials.
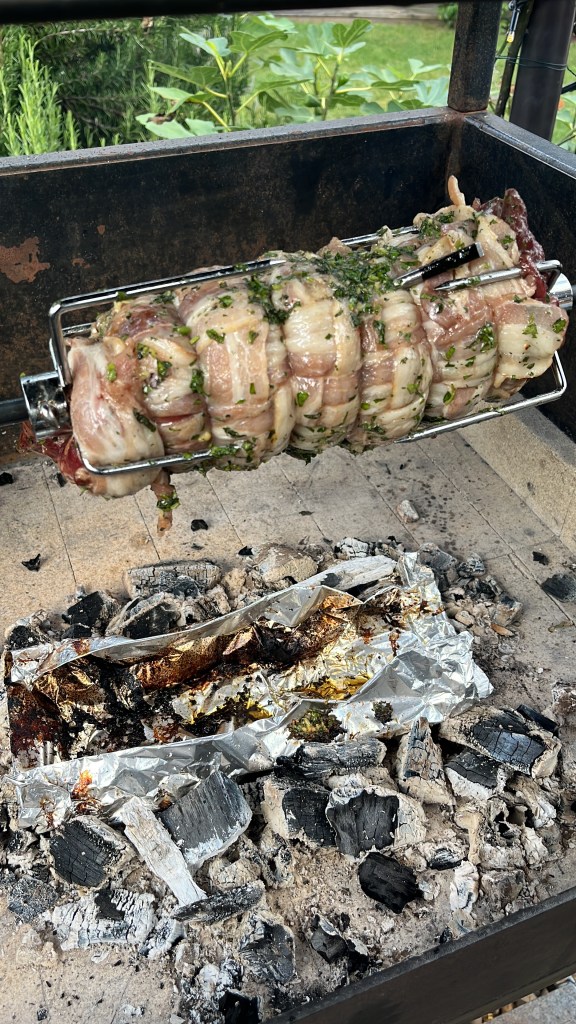
When you are ready, light your fire. As usual with the fire cage I used a mixture of Globaltic lump charcoal and Braai wood from Firemasters. The fire needs to be lit at least 45-50 minutes before you want to cook to let the embers develop their lovely consistent, intense heat. Just before starting to cook, I threaded the rotisserie spit through the venison and secured it with the prongs. Meanwhile, I created a kind of foil tray to catch any drips and arranged 2 rows of embers either side of where the spit will rest – I wanted the meat to get a kind of glancing blow of heat as it turns leading to a nice slow cook. Every now and then, I stuck a big sprig of rosemary onto the fire to add another smoky note – it is really hard to describe what rosemary smoke smells like (can a smell be astringent?) but I really like it. To get a nice medium-rare, the internal temperature should be somewhere between 51-53°c when you serve the venison, so it should be taken off the heat at about 47-48°c – the temperature will keep rising when the joint is resting. The perfect tool for monitoring this is the Meater+ probe which has the advantage of being wireless and gives a constant reading. It took an hour and forty minutes to cook and every 10 minutes or so I painted on a bit more chimichurri. There’s something almost alchemic about the oily/vinegary combination of this sauce which just works wonders with any meat.
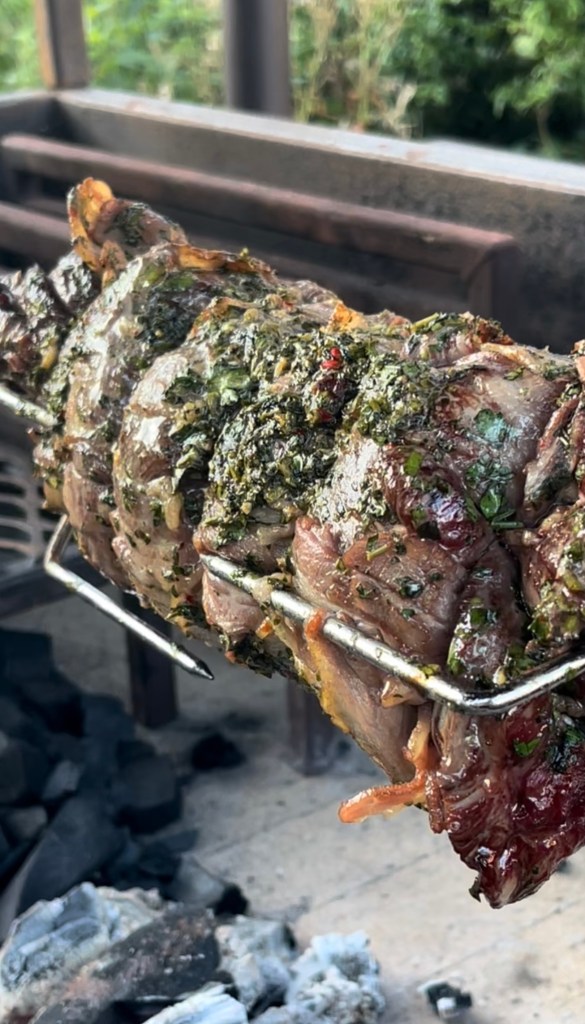
When it was done, the bacon still looked a little peely-wally (look it up if you don’t have Scottish ancestry) so I put a stout pan directly on the embers to crisp it up a bit. I snipped off the butcher’s twine, cut it into fat slices and served in brioche burger buns with yet more chimichurri. It tasted amazing. The bacon lattice had done its job and kept the venison nice and juicy, and the rosemary and Braai wood had imparted just enough smoky flavour to be delicious without being overpowering. The cooking was just right for sandwiches, but I think if you wanted this to be a Sunday roast, it would be wise to take it off a degree or two earlier.
All you need now is a mate who gets meat for their birthday!
Chimichurri Sauce
This is one of those things, a bit like Salsa Verde, that does not necessarily have a clearly defined recipe, more a starting point from which you adapt the ingredients and the quantities as you like them. This is roughly what I used, but bear in mind this should be a bold, punchy flavour so if you are in any doubt with the quantities of garlic, mustard or anchovy, go big:
A whole packet of parsely
A whole packet of coriander
A whole packet of basil
2-3 finely chopped anchovy fillets
2 – 3 tsp capers roughly chopped
2 tsp Dijon mustard
2-3 garlic cloves crushed into a paste
A red chilli finely chopped
Olive Oil – a good glug, say about 50ml
Red Wine vinegar – a good swig, say about 20 ml
Salt & Pepper
Now you can just throw all the ingredients in your food processor and blend away, but this does produce quite a fine, almost emulsified sauce. I much prefer to chop everything by hand, add it all to a big bowl and then add the oil and vinegar, tasting as I go until I’m happy. The sauce should be quite loose, and I definitely prefer it with a stronger acidic tang from the vinegar, so I probably put in a touch more than most recipes would suggest. Make loads as it keeps pretty well in the fridge, but it is so good you will probably, like me, find plenty of ways to use it up quickly!
