I often need to have a good long think before setting out on a new blog post. Is it to be about a new dish I’ve cooked, a new piece of kit or a party we’ve held? Mostly, they seem to end up being a bit of a combination of all three, but there is always a nagging doubt of originality and just the littlest fear that I’m riding on the coat tails of proper chefs and food authors who do this sort of thing for a living. I’m keen to avoid replicating recipes verbatim from an individual, so for this blog I am writing about this brilliant, traditional Italian dish which I cooked by gathering together the best bits from a range of different sources. A bit like the British Lions I suppose.
Porchetta starts with pork belly – a lot of recipes call for the loin to be included as well so the belly wraps around the loin to make a bigger joint. However, we only had a couple of people coming for lunch and, to be honest, I find pork loin one of those bits of a pig that has the most delicate (or absence of) flavour and I wasn’t sure it would add anything other than about £15 to the cost, so I left it out.
The next key elements are the flavours to be included in the rub/marinade for the meat. Almost all recipes I read include Fennel seeds, garlic and lemon zest. Some go for rosemary or thyme or oregano, some include chilli flakes, one I found even included fennel pollen (I looked it up. It’s astonishingly expensive. Decided to leave it out). I found some chefs prepare a kind of stuffing of lardons and nuts to go in theirs and others prick the flesh and massage in a glug of white wine. After I’d cooked it, the Savage BBQ guys on Instagram recommended adding Nduja. It seems to me that, whilst this is very much a traditional dish, you can pick and choose what you want to include and it can still be called Porchetta. Having now actually cooked one, I imagine whatever you do, the result will still be absolutely banging, to use the modern vernacular.
In any event, this is what I did:
For Sunday lunch, we set out on Saturday morning to the butchers at Webbs of Wychbold. They are brilliant. I explained to the butcher what I wanted and she disappeared into their dry-ager and returned with a slab of belly with the ribs still on. She asked a load of questions about how I was going to cook the porchetta and offered loads of good advice as she neatly removed the rib bones and scored the skin for me. We paid about £30 for just over 4kg of pork belly, plus she chucked in the ribs and the porky equivalent of a bavette steak for free. Perfect.
Once we got it home, I carefully sliced away a couple of sections to make it an even thickness, plus trimmed off one end to square it up a bit. I think I will make some bacon with these bits, but they went in the freezer for the time being. Next, the marinade which was largely based on what we had in the garden/fridge/store cupboard:
Marinade Ingredients.
(Very rough measurements)
3 tbsp Fennel seeds
A big handful each of rosemary and marjoram (leaves only – strip them off the woody stems)
Zest of 2 lemons
Juice of 1 lemon
4 fat garlic cloves
1tsp Piment d’Espelette (you can substitute this with Cayenne pepper or chilli flakes, or do without)
20g of rock salt
About the same amount of olive oil as the lemon juice
First, heat a pan and dry fry the fennel seeds until they start giving off a lovely aroma and have taken on a bit of colour. Add them to a pestle and mortar and give them a good grind. Now add your sliced up garlic, the lemon zest, the piment d’Espelette and the salt and grind away until you get a smoothish paste. Finely chop your herbs and add them to the paste and keep grinding. Finally, add the lemon juice and olive oil and incorporate. A note of caution here; it was extraordinarily hot when I did this, plus my pestle and mortar is one of those heavy-duty granite ones. If you want avoid the super perspiring “Ted Stryker making an emergency landing” look, you could blitz this all up with a stick blender or one of those mini food processors. Or wait for it to be colder.
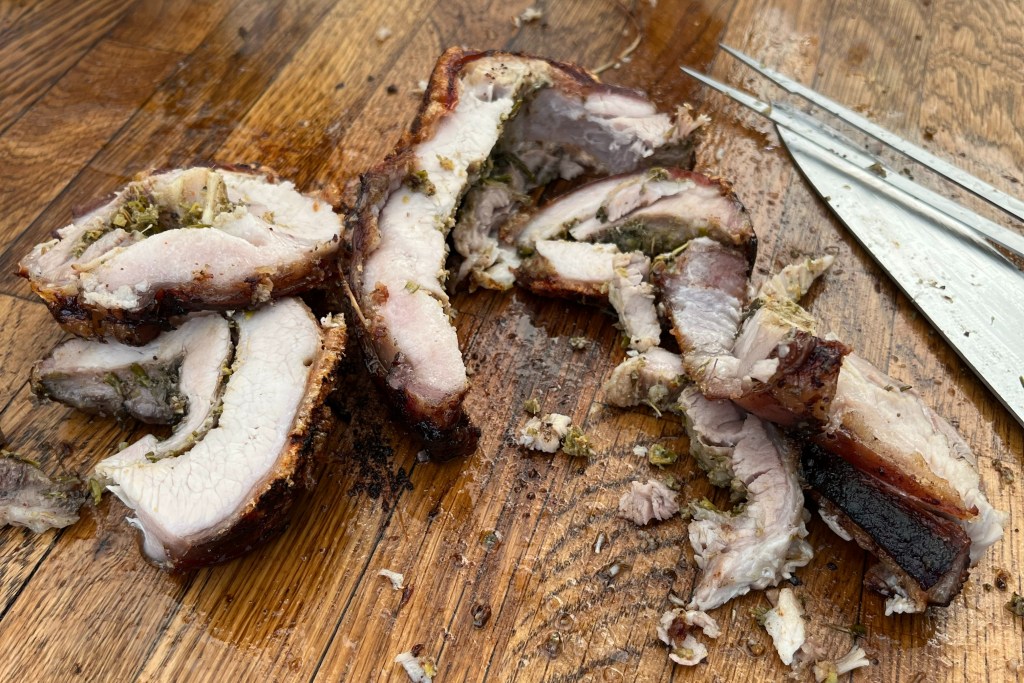
Going back to the pork, I laid the rectangular piece skin-side down on my board with the long side facing me and, with my sharpest knife, made a shallow, horizontal slice all the way along the front edge to start the process of butterflying the joint. I then held open the small wing of flesh I’d created and made another pass, keeping my blade parallel to the board and making lots of shallow cuts (a bit like fileting a fish), opening the wing further until stopping just short of the end. Butterflying the belly means you get more surface area to add marinade to, plus, I think, makes it a bit easier to roll up afterwards. Taking the marinade, I poured about half on the top of the pork, spreading it evenly with a spatula. This top bit got rolled fairly tightly leaving the bit with the skin on still flat on the board. The remaining paste got spread all over this part, then I rolled this bit around the bit I’d already rolled. Picture a porcine Swiss roll.
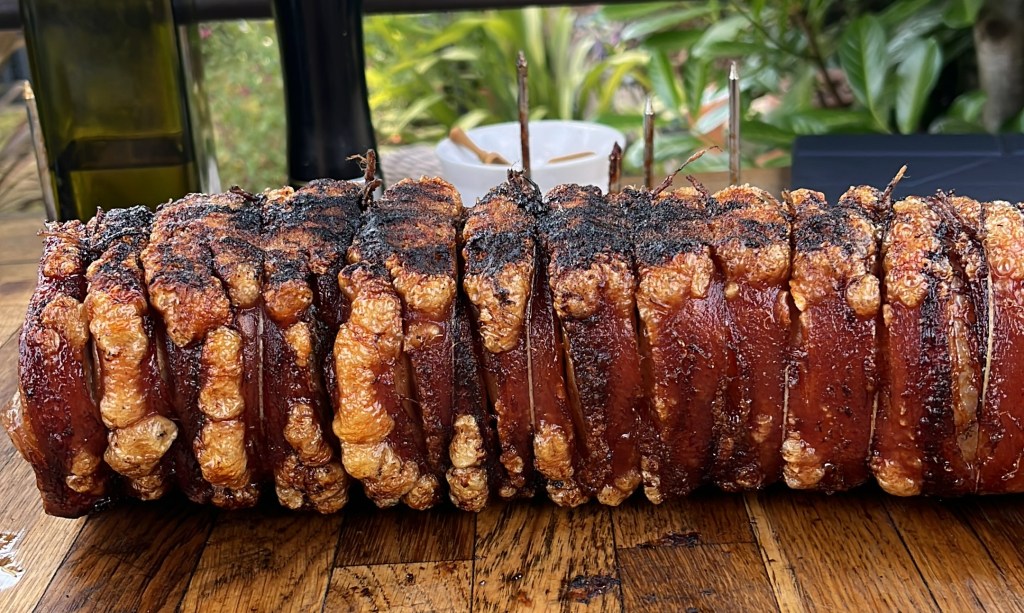
To hold everything together, and to keep as uniform a shape as possible, I tied the porchetta every couple of centimetres. Proper butcher’s knots are a bit fiddly, but there are some brilliant videos on YouTube to teach you. I did a lot of practice with a rolling pin which was time well invested since the knots, once mastered, do lock everything in place properly. Finally, pat the skin of the pork dry, and rub in a good lot of salt. Place the joint on a rack, above a tray and leave, uncovered, in your fridge overnight. The salt will draw moisture from the skin and should help to get the crackling going.
Now nearly all the recipes I read to prep for this give times and temperatures for cooking in the oven. I really wanted to build a fire and use the rotisserie for the Fire Cage, and “Oven Journal” doesn’t quite have the same ring does it? I lit a load of charcoal and, once it was glowing nice and evenly, I made 2 long, thin coal beds each side of where the Porchetta was going to cook – I didn’t want the heat directly under the meat – I figured more of a glancing blow would be best. Between these beds, I made a kind of boat out of tin foil to catch the inevitable drips. Once everything was set, I threaded the spit through the middle of the porchetta and mounted it in the motor to get going and shoved my Meater thermometer right in the middle to monitor the temperature; pork is safe to eat at 75°C but I wanted it to go a bit beyond that to render out more of the fat. The Meater app recommended 90°C, so I went with that.
It took a long time. Most oven-based recipes quote about 3 hours, but this took just over 5. It was, however, very cool to watch the evolution of the cook and see how the skin changed from pale, dry and slightly wan, to golden, burnished and crunchy. The Meater showed that for an hour, the joint got stuck at about 86°C. This is known as the stall and happens when the moisture inside the meat makes its way to the surface and evaporates. If you’re doing pulled pork, you just have to wait it out until you get to at least 95°C. Luckily, we had company and sunshine so the wait was fun. However, on reflection we probably could have eaten earlier – you don’t really want your Porchetta to be too soft I reckon.
Lastly, I wanted a blast of direct heat to really crisp the crackling, so I stopped the motor, moved the foil boat out of the way and raked all the charcoal together underneath the porchetta for about 10 minutes, letting the motor run for a quarter turn every couple of minutes to expose a different section to the heat. It worked! The crackling was perfect. What was also noticeable was how much of the fat had rendered – the foil boat worked a treat and caught the drips. This meant that each bite was mostly meat, without any big blobs of fat that can sometimes make pork belly a little unappealing in my view. We served the Porchetta with grilled corn (basted with the dripping from the pork), grilled courgettes, roast cauliflower, plus a coleslaw Polly had made with a delicious cider vinegar dressing.
Like a lot of these low and slow cooks, nothing about doing this is difficult, but you do need some time on your hands. It’s a brilliant recipe and could easily have fed 8-10 people. Unusually, I remembered to take a photo of the finished product and whenever I look at it, it will remind me that I need to cook this again someday. When I do, I will make a couple of tweaks:
- I will leave it to marinade for longer. 36-48 hours should do the trick I think.
- I will be braver with the salt in the marinade. Not that the finished result was bland in any way, but an extra 10g or so, distributed evenly through the whole piece would bring all the flavours together a bit better. 30g might seem a lot, but you are seasoning about 4kg of meat
- Likewise, I would add a few more fennel seeds, but then again, I do absolutely love that anise flavour. I might even consider adding a swig of pastis into the marinade, but that might well be dependent on who I am cooking for.
- I might shell out on the fennel pollen. I hope it’s the same as saffron in that it is expensive, but you get quite a lot of bang for your buck.
- I will score the skin at more regular intervals to make it a bit easier to carve.
It’s definitely one to have a crack at, especially if you have a few folk coming over.
